In today's digital age, crafting impeccable documents is an essential skill for both personal and professional success. One of the key elements that contribute to a well-structured document is the margin settings. Google Docs, a versatile and widely used word processing tool, offers users the flexibility to customize margins according to their specific needs. Understanding how to effectively adjust Google Docs margins can greatly enhance the presentation and readability of your documents.
As we delve into the intricacies of Google Docs margins, it's important to appreciate the impact that proper margin settings can have on document aesthetics. Margins not only frame the content but also ensure that printed documents are visually pleasing and easy to read. Whether you're preparing a business report, an academic paper, or a personal project, knowing how to manipulate Google Docs margins can make a significant difference in the final product.
This comprehensive guide aims to provide a detailed exploration of Google Docs margins, offering step-by-step instructions, best practices, and troubleshooting tips. By the end of this article, you'll have a thorough understanding of how to optimize your document layout using Google Docs margins, ensuring your work stands out with professionalism and clarity.
Table of Contents
Understanding Margins in Google Docs
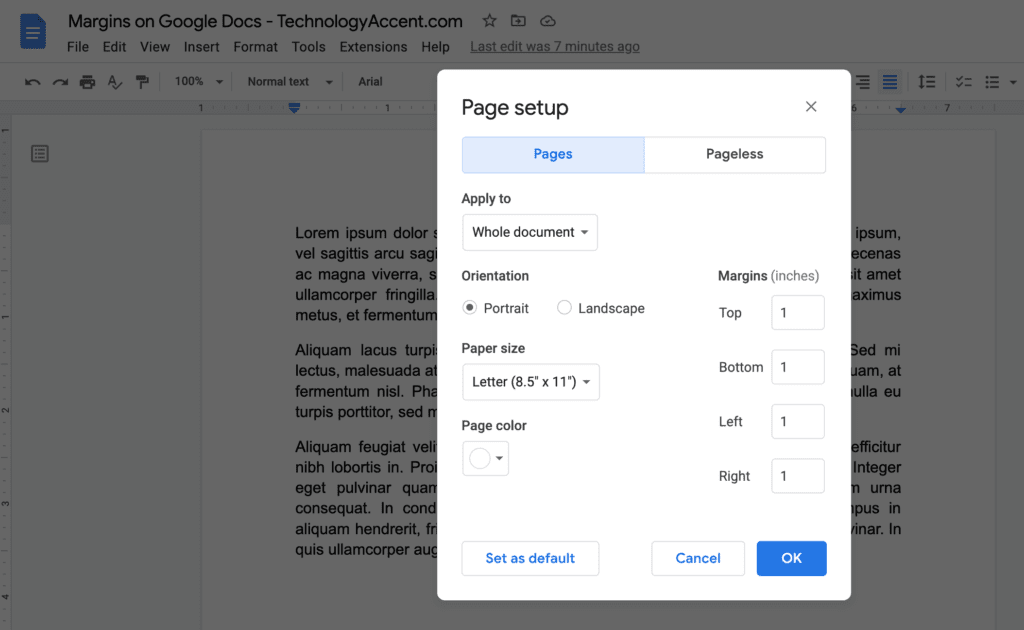
Google Docs margins define the space between your content and the edge of the page. These margins are crucial as they help frame your document, giving it a structured and organized appearance. Margins can be adjusted for various reasons, including improving readability, accommodating printing requirements, or adhering to specific formatting guidelines.
By default, Google Docs sets standard margins of 1 inch on all sides. However, these default settings can be modified to suit your specific needs. Understanding how margins work in Google Docs is the first step towards creating a document that meets your expectations.
Types of Margins
There are four types of margins in Google Docs:
- Top Margin: The space from the top edge of the page to the beginning of the content.
- Bottom Margin: The space from the bottom of the page to the end of the content.
- Left Margin: The space from the left edge of the page to the start of the content.
- Right Margin: The space from the right edge of the page to the end of the content.
Each type of margin can be adjusted independently, allowing for a high degree of customization. This flexibility ensures that you can tailor your document's margins to fit a variety of formats and purposes.
Why Margins Matter
Proper margin settings enhance the visual appeal of your document and ensure that the content is presented in an organized manner. Margins also play a vital role in printing, preventing text from being cut off and ensuring that the document looks neat and professional.
Furthermore, in academic or professional settings, specific margin requirements may be outlined in style guides such as APA, MLA, or Chicago. Adhering to these guidelines is essential for compliance and to maintain a consistent appearance across different documents.
Setting Default Margins
Setting default margins in Google Docs can save you time and ensure consistency across your documents. By establishing default margin settings, you can streamline your workflow and avoid the need to adjust margins with each new document.
Steps to Set Default Margins
To set default margins in Google Docs, follow these steps:
By following these steps, you can establish a consistent margin setting that will be applied automatically to any new documents you create in Google Docs. This feature is particularly useful for those who frequently work with documents that require specific formatting standards.
Customizing Margins for Specific Needs
While default margins provide a standard framework, there may be instances where you need to customize margins to meet specific requirements. Google Docs allows you to make these adjustments easily, ensuring that your document is tailored to its intended purpose.
Custom Margin Adjustments
To customize margins in Google Docs, you can use the following methods:
- Manual Entry: Enter specific margin values in the Page setup dialog box.
- Drag and Drop: Use the ruler at the top of the document to drag the margin lines to the desired position.
Each method provides a different level of control, allowing you to choose the one that best suits your needs. Whether you're adjusting margins for a unique document layout or adhering to specific guidelines, Google Docs offers the flexibility to make precise changes.
Considerations for Custom Margins
When customizing margins, consider the following factors:
- Readability: Ensure that margins do not make the content appear cramped or difficult to read.
- Printing: Verify that custom margins are suitable for printing, preventing any text from being cut off.
- Style Guides: Adhere to any specific margin requirements outlined in style guides or formatting standards.
By taking these considerations into account, you can effectively customize margins to create a document that is both visually appealing and compliant with any necessary guidelines.
Using the Ruler for Precise Adjustments
The ruler in Google Docs is a powerful tool that allows for precise margin adjustments. With the ruler, you can visually manipulate the placement of margins, providing a hands-on approach to document formatting.
Accessing the Ruler
The ruler is located at the top of the Google Docs interface, just above the document. If the ruler is not visible, you can enable it by clicking on "View" in the top menu and selecting "Show ruler."
Making Adjustments with the Ruler
To adjust margins using the ruler, follow these steps:
This method allows for quick and precise adjustments, making it ideal for those who prefer a more tactile approach to document formatting. The ruler provides real-time feedback, allowing you to see how changes to the margins affect the overall layout of your document.
Margins in Collaborative Documents
Collaboration is a key feature of Google Docs, allowing multiple users to work on a document simultaneously. However, when adjusting margins in a collaborative document, it's important to consider the impact on other users and the overall document structure.
Best Practices for Collaborative Margin Adjustments
When working on a collaborative document, follow these best practices to ensure smooth margin adjustments:
- Communicate with Collaborators: Inform your collaborators of any margin changes and discuss how these adjustments will affect the document.
- Use Commenting Features: Utilize Google Docs' commenting features to suggest margin changes and gather feedback from your collaborators.
- Maintain Consistency: Ensure that margin adjustments are consistent with the overall document layout and style.
By following these best practices, you can effectively manage margin adjustments in collaborative documents, ensuring that all contributors are on the same page and that the document maintains a cohesive appearance.
Adjusting Margins for Printing
When preparing a document for printing, it's crucial to ensure that the margins are set correctly to prevent any content from being cut off. Google Docs provides options to adjust margins specifically for printing needs, ensuring that your printed documents look professional and well-organized.
Steps for Adjusting Printing Margins
To adjust margins for printing in Google Docs, follow these steps:
By carefully setting your document's margins for printing, you can ensure that the content is not only legible but also aesthetically pleasing, making a positive impression on your audience.
Margins in Different Templates
Google Docs offers a variety of templates for different document types, each with its own preset margin settings. Understanding how margins work within these templates can help you select the best format for your needs and make any necessary adjustments to align with your specific requirements.
Exploring Template Options
Google Docs provides templates for various purposes, including:
- Business Documents: Templates for reports, invoices, and letters.
- Academic Papers: Templates adhering to APA, MLA, and other academic formatting styles.
- Creative Projects: Templates for newsletters, brochures, and creative writing.
Each template comes with default margin settings that can be customized as needed. By exploring these options, you can find a template that meets your needs and make any necessary adjustments to the margins to ensure a perfect fit.
Customizing Template Margins
To customize margins within a template, simply follow the same steps outlined for adjusting margins in standard documents. By doing so, you can tailor the template's layout to better suit your needs while maintaining the overall design and structure.
Common Margin Mistakes to Avoid
While adjusting margins in Google Docs is a straightforward process, there are common mistakes that can detract from your document's overall appearance and functionality. Being aware of these pitfalls can help you avoid them and ensure your document is as polished as possible.
Overly Narrow or Wide Margins
One common mistake is setting margins that are either too narrow or too wide. Narrow margins can make your document appear cluttered and difficult to read, while overly wide margins can waste valuable space and diminish the amount of content that fits on a single page.
Inconsistent Margins
Inconsistent margins can disrupt the flow of your document and make it appear unprofessional. Ensure that margins are consistent throughout your document to maintain a cohesive and organized appearance.
Ignoring Printing Requirements
Failing to account for printing requirements can result in content being cut off or misaligned. Always verify that your margins are suitable for the intended printing format to avoid any issues.
Troubleshooting Margin Issues
Occasionally, you may encounter issues with margins that require troubleshooting. Whether it's a misalignment or an unexpected formatting error, knowing how to address these issues can save you time and frustration.
Common Margin Issues and Solutions
Here are some common margin issues and their solutions:
- Margins Not Saving: Ensure that you click "OK" after adjusting margins in the Page setup dialog box to save your changes.
- Text Cut Off: Check that your margins are not too narrow for the content and adjust them accordingly.
- Inconsistent Formatting: Verify that the margins are consistent throughout the document and make any necessary adjustments.
By addressing these common issues, you can ensure that your document's margins are set correctly and that your document maintains a professional appearance.
Advanced Margin Techniques
For users seeking to further enhance their document layout, advanced margin techniques offer additional options for customization and precision. These techniques can be particularly useful for complex documents requiring unique formatting or for professional publications that demand a high level of detail.
Using Section Breaks for Margin Variations
Section breaks allow you to apply different margin settings to specific parts of your document. This is useful for documents that require varying layouts within the same file, such as a report with distinct sections.
Incorporating Tables and Images
When incorporating tables and images, adjust margins to accommodate these elements without disrupting the overall layout. Consider using custom margins for sections containing graphics to ensure they are displayed optimally.
Combining Styles and Margins
Experiment with combining different styles and margin settings to create unique and visually appealing documents. This may involve adjusting margins to complement specific font choices or color schemes, enhancing the overall design.
Frequently Asked Questions
Q1: How do I reset margins to default in Google Docs?
A1: To reset margins to default in Google Docs, open the Page setup dialog box, click on "Set as default," and then click "OK" to apply the changes.
Q2: Can I set different margins for different pages in Google Docs?
A2: While Google Docs does not support different margins for individual pages, you can use section breaks to apply different margin settings to specific sections of your document.
Q3: How do I share a document with custom margins in Google Docs?
A3: To share a document with custom margins, click on "Share" in the top right corner, enter the email addresses of your collaborators, and choose their permission levels. Custom margins will be maintained in the shared document.
Q4: Why do my margins change when I print from Google Docs?
A4: Margins may change if the print settings do not match the document settings. Ensure that your printer settings align with the margins specified in Google Docs to avoid discrepancies.
Q5: How do I fix alignment issues caused by margin settings?
A5: To fix alignment issues, verify that your margins are set consistently and adjust them as needed. Use the ruler for precise adjustments to ensure that content is aligned correctly.
Q6: Can I export a Google Docs document with custom margins to other formats?
A6: Yes, you can export Google Docs documents with custom margins to various formats, such as PDF or Microsoft Word, by clicking on "File," selecting "Download," and choosing your desired format.
Conclusion
Mastering the art of Google Docs margins is an essential skill for anyone looking to produce professional, well-organized documents. By understanding the various aspects of margin customization, from setting default margins to using the ruler for precise adjustments, you can create documents that meet your specific needs and enhance their visual appeal. With the comprehensive knowledge gained from this guide, you're well-equipped to tackle any document layout challenge, ensuring your work stands out with clarity and professionalism.
For further reading and resources, consider visiting the Google Docs Help Center for additional tips and guidance on optimizing your documents.
Article Recommendations

ncG1vNJzZmibkafBprjMmqmknaSeu6h6zqueaKGTpLuqr4yamq2qlajApr%2BMqJ1moJ%2BhubrDzqibaJ%2BfpLStsYydppyrXaKus7PIp6pnoKSiuQ%3D%3D