Google Docs offers a versatile platform for creating, editing, and sharing documents with ease, and one of its key features is the ability to adjust page margins. Margins play a crucial role in determining the layout and readability of your document, making it essential to understand how to customize them to suit your needs. Whether you're preparing a school assignment, a business report, or a personal letter, knowing how to change margins in Google Docs can enhance the professionalism and clarity of your document.
In this comprehensive guide, we will walk you through each step of adjusting margins in Google Docs, providing detailed explanations and practical tips to ensure your documents are formatted perfectly. From standard margin settings to custom configurations, you'll gain the expertise needed to optimize your document's appearance. Our guide is designed to be accessible even if you're new to Google Docs, with simple instructions and visual aids to make the process straightforward and efficient.
By the end of this article, you'll have a thorough understanding of how to change margins in Google Docs, along with insights into why margins matter and how they can impact your document's overall presentation. So, whether you're aiming for a polished, professional look or simply need to meet specific formatting guidelines, our guide will equip you with the skills to achieve your goals effortlessly.
Table of Contents
Standard Margin Settings
When you create a new document in Google Docs, it comes with default margin settings that are typically sufficient for most general purposes. These standard margins are set to one inch (2.54 cm) on all sides of the document. This default configuration provides a balanced layout, ensuring that text is comfortably positioned on the page and allowing for easy readability and printing.
Understanding why these standard margins are chosen can help you appreciate their versatility. One-inch margins are commonly used in academic and professional documents because they offer a clean and organized appearance. They prevent text from crowding the edges of the page, which can make a document look cluttered and harder to read. Additionally, standard margins help ensure that documents are compatible with most printers, reducing the risk of text being cut off during printing.
However, depending on your specific needs or formatting requirements, you may find it necessary to adjust these margins. For instance, academic papers often require different margin sizes, especially when adhering to specific formatting styles like APA or MLA. Business documents might also benefit from custom margins to accommodate headers, footers, or company branding elements.
In the following sections, we'll explore how to modify the standard margin settings in Google Docs to fit various document types and purposes. Whether you're looking to increase or decrease the margins, we'll guide you through the process step-by-step, ensuring you can achieve the desired layout effortlessly.
Customizing Margins
Customizing margins in Google Docs allows you to tailor the layout of your document to better fit your specific requirements. Whether it's creating more space for annotations, accommodating unique formatting guidelines, or simply personal preference, adjusting margins can significantly enhance the overall presentation of your document.
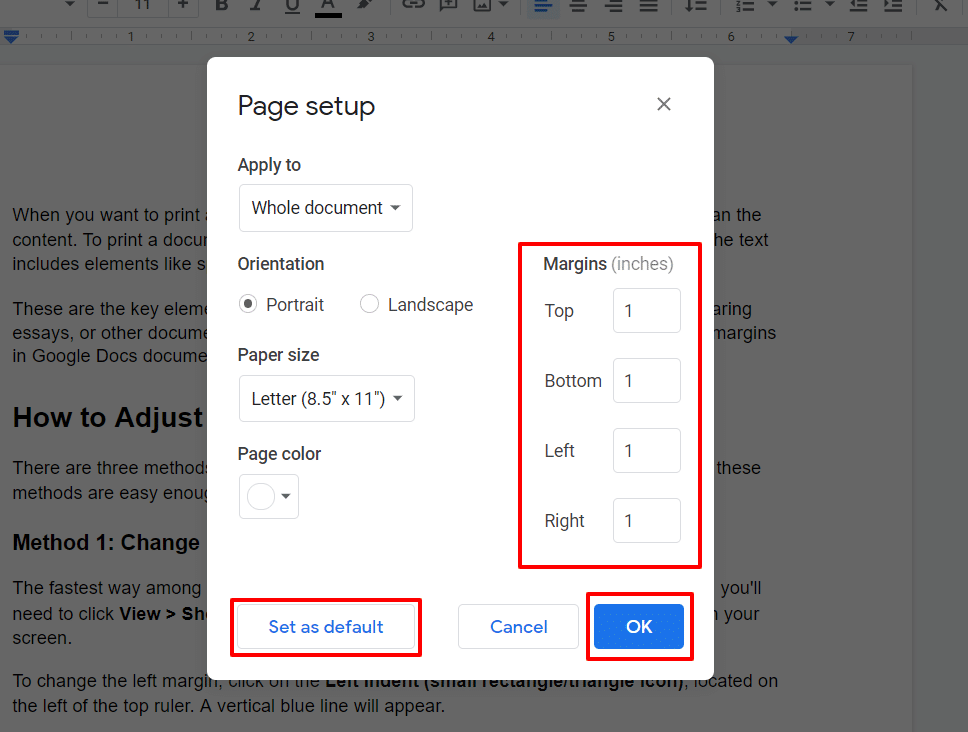
To begin customizing margins, open your Google Docs document. Navigate to the "File" menu located at the top-left corner of the screen. From the dropdown list, select "Page setup." This action opens the Page Setup dialog box, where you'll find options to modify various aspects of your document's layout, including margins.
In the Page Setup dialog box, you'll see fields labeled "Top," "Bottom," "Left," and "Right." These fields represent the margin sizes for each corresponding side of the page. To customize your margins, simply enter the desired measurements in these fields. You can use inches or centimeters, depending on your preference or the requirements of your document.
It's important to note that when customizing margins, you should consider the overall balance and readability of your document. Margins that are too narrow can make the text look cramped and difficult to read, while margins that are too wide may waste valuable space and result in a document that feels sparse. Aim for a configuration that maintains a professional appearance while meeting the specific needs of your document.
After entering your desired margin sizes, click the "OK" button to apply the changes. Your document will automatically adjust to reflect the new margin settings. If you're not satisfied with the result, you can always return to the Page Setup dialog box to make further adjustments until you're happy with the layout.
Using the Page Setup Dialog
The Page Setup dialog is a powerful tool in Google Docs that allows you to control various aspects of your document's layout, including margins, page orientation, and paper size. Understanding how to effectively use this dialog is key to customizing your document to meet specific formatting needs.
To access the Page Setup dialog, open your Google Docs document and click on the "File" menu at the top of the screen. From the dropdown menu, select "Page setup." This will open a window where you can adjust several settings related to your document's layout.
Within the Page Setup dialog, you'll find fields for "Top," "Bottom," "Left," and "Right" margins. These fields allow you to specify custom measurements for each side of the page. Depending on the requirements of your document, you can enter measurements in either inches or centimeters. This flexibility is particularly useful if you're working with international formatting standards that may prefer one unit of measurement over the other.
In addition to margins, the Page Setup dialog also offers options to change the page orientation (portrait or landscape) and the paper size (e.g., Letter, A4). These settings can be adjusted independently of the margin settings, allowing for even greater customization of your document's layout.
Once you've made the desired changes in the Page Setup dialog, click "OK" to apply them to your document. If you're not satisfied with the outcome, you can easily return to the dialog to make further adjustments. This iterative process allows you to experiment with different configurations until you achieve the perfect layout for your document.
Adjusting Margins with the Ruler
In addition to using the Page Setup dialog, Google Docs offers a convenient way to adjust margins directly on the page using the ruler. This method provides a visual representation of your document's layout, allowing for precise adjustments without needing to open a separate dialog box.
To use the ruler for adjusting margins, ensure that the ruler is visible in your Google Docs document. If it's not already displayed, you can enable it by clicking on "View" in the top menu and selecting "Show ruler" from the dropdown list.
Once the ruler is visible, you'll notice markers on both the horizontal and vertical rulers indicating the current margin settings. To adjust the margins, click and drag these markers to the desired position. As you move the markers, you'll see a dotted line indicating the new margin position, giving you immediate feedback on the changes you're making.
Using the ruler to adjust margins is particularly useful for making quick, small changes or for visually aligning margins with other elements in your document. It's an intuitive method that allows you to see the impact of your adjustments in real-time, making it easy to achieve the precise layout you're aiming for.
However, it's important to exercise caution when using the ruler for margin adjustments. Because this method relies on manual adjustments, it can be easy to inadvertently set margins that are uneven or inconsistent. To ensure a professional and balanced layout, it's often a good idea to double-check your margin settings in the Page Setup dialog after making changes with the ruler.
Setting Default Margins
If you frequently create documents with specific margin settings, you may find it convenient to set those margins as the default for all new documents. This feature can save time and ensure consistency across multiple documents, especially if you're working on a series of related projects or adhering to specific formatting guidelines.
To set default margins in Google Docs, open a new or existing document and navigate to the "File" menu. From the dropdown list, select "Page setup" to open the Page Setup dialog. Enter your desired margin sizes in the "Top," "Bottom," "Left," and "Right" fields, just as you would for any individual document.
After entering your preferred margin settings, look for the "Set as default" button located at the bottom of the Page Setup dialog. Clicking this button will save your current margin configuration as the default setting for all future documents you create in Google Docs.
It's worth noting that setting default margins will not affect existing documents; the new default settings will only apply to documents created after you've made this change. If you need to apply the new margins to an existing document, you'll need to manually update the margin settings for that document using the Page Setup dialog.
By setting default margins, you can streamline your document creation process and ensure that all new documents adhere to the same formatting standards. This feature is especially beneficial for teams or organizations that require consistent formatting across multiple documents, as it helps maintain uniformity and professionalism in all written materials.
Impact of Margins on Document Layout
Margins play a vital role in determining the overall layout and readability of a document. They provide the necessary white space around the text, helping to create a clean and organized appearance. Properly set margins can enhance the visual appeal of a document, making it more inviting to read and easier to follow.
One of the primary functions of margins is to prevent text from crowding the edges of the page. When text is too close to the edges, it can create a cramped and cluttered appearance, making it difficult for readers to focus on the content. Adequate margins provide a buffer zone, ensuring that text is comfortably positioned on the page and allowing for a more relaxed reading experience.
In addition to improving readability, margins also play a role in accommodating other elements within a document, such as headers, footers, and page numbers. By providing sufficient space for these elements, margins help ensure that they are clearly separated from the main body of text, maintaining a professional and polished appearance.
Furthermore, margins can impact the overall length of a document. Wider margins result in shorter lines of text, which can increase the number of pages required for a given amount of content. Conversely, narrower margins allow for longer lines of text, potentially reducing the total page count. Understanding this relationship can help you optimize your document's layout to achieve the desired length and appearance.
Ultimately, the impact of margins on document layout highlights the importance of carefully considering your margin settings. By choosing appropriate margins, you can enhance the readability, visual appeal, and professionalism of your document, ensuring that it effectively communicates your message to your audience.
Troubleshooting Margin Issues
While adjusting margins in Google Docs is generally a straightforward process, you may occasionally encounter issues that affect your document's layout. Understanding how to troubleshoot these common margin-related problems can help you quickly resolve them and ensure your document looks its best.
One of the most common margin issues is text overflowing or being cut off at the edges of the page. This problem often arises when margins are set too narrow or when the document contains elements that extend beyond the margin boundaries. To resolve this issue, try increasing the margin size in the Page Setup dialog or adjusting the size and placement of any images, tables, or other elements within the document.
Another potential issue is inconsistent or uneven margins, which can create an unprofessional appearance. This problem may occur if margins are adjusted manually using the ruler or if different sections of the document have been formatted separately. To ensure consistent margins throughout your document, use the Page Setup dialog to set uniform margins for the entire document or apply the same margin settings to each section individually.
Occasionally, margin settings may appear to be correct in the Page Setup dialog but display differently when printed. This discrepancy can be due to printer settings or compatibility issues. To address this, check your printer's settings to ensure they match your document's margin configuration. Additionally, consider exporting your document as a PDF and printing from the PDF file, as this format can help preserve formatting and margin settings more accurately.
If you're still experiencing margin issues after trying these troubleshooting tips, consider consulting Google Docs' help resources or seeking assistance from knowledgeable colleagues or online communities. With a little persistence and attention to detail, you can overcome most margin-related challenges and achieve the desired layout for your document.
Importance of Margins in Different Document Types
Margins are an essential aspect of document formatting, and their importance can vary depending on the type of document you're creating. Understanding how margins affect different document types can help you make informed decisions about the appropriate margin settings for your specific needs.
In academic writing, margins play a crucial role in adhering to specific formatting guidelines, such as those outlined by APA, MLA, or Chicago style. These guidelines often specify standard margin sizes to ensure consistency and readability across academic papers. Properly set margins in academic documents can also provide space for annotations, comments, and feedback from instructors or peers.
For business documents, margins contribute to a professional and polished appearance. Reports, proposals, and presentations often require well-defined margins to accommodate headers, footers, company logos, and other branding elements. Consistent margins help maintain a cohesive look across all pages, enhancing the document's overall impact and professionalism.
Personal documents, such as letters or invitations, may have more flexibility in margin settings. However, even in these cases, well-chosen margins can enhance the visual appeal and readability of the document. For example, wider margins can create a sense of elegance and formality in a letter, while narrower margins may be suitable for more casual correspondence.
Ultimately, the importance of margins in different document types highlights the need to carefully consider your margin settings based on the specific purpose and audience of your document. By selecting appropriate margins, you can enhance the readability, appearance, and effectiveness of your document, ensuring it communicates your message clearly and professionally.
Collaborative Settings and Margin Adjustments
Google Docs is renowned for its collaborative features, allowing multiple users to work on a document simultaneously. However, when collaborating on a document, it's important to consider how margin adjustments can impact the overall layout and readability for all contributors.
When working on a collaborative document, it's essential to establish clear guidelines for margin settings. This ensures consistency and prevents conflicts that may arise if different users have varying preferences for margin sizes. Consider discussing and agreeing on a standard margin configuration at the outset of the project to maintain a cohesive appearance throughout the document.
Google Docs also offers version history, which allows you to track changes and revert to previous versions if needed. This feature can be invaluable when experimenting with margin adjustments, as it enables you to compare different configurations and revert any changes that may not have worked as intended.
Additionally, consider using comments and suggestions when discussing margin adjustments with collaborators. This approach allows contributors to provide input and feedback without directly altering the document, helping to maintain the integrity of the original layout while facilitating constructive discussions.
By effectively managing collaborative settings and margin adjustments, you can ensure a seamless and productive collaboration experience in Google Docs. Clear communication and adherence to agreed-upon guidelines will help maintain a professional and consistent appearance for the final document.
Printing and Margin Considerations
When preparing a document for printing, it's important to consider how margin settings can impact the final printed result. Properly adjusted margins can help ensure that your document looks professional and aligns correctly on the page.
One key consideration when printing is the compatibility of your margin settings with the printer's capabilities. Some printers may have specific minimum margin requirements to prevent text or images from being cut off during printing. Before finalizing your document, check your printer's manual or settings to confirm that your chosen margins are compatible.
Additionally, consider the type of paper and its size when setting margins for printing. Different paper sizes, such as Letter, A4, or Legal, may require specific margin adjustments to ensure the document is correctly aligned. Google Docs offers options to select the paper size in the Page Setup dialog, allowing you to tailor your margin settings accordingly.
Finally, if your document contains elements that extend to the edge of the page, such as images or background colors, consider using a "bleed" setting. This technique involves extending the document's content slightly beyond the page edges, ensuring that no white space appears when the document is trimmed to size after printing.
By carefully considering printing and margin considerations, you can achieve a professional and polished appearance for your printed documents, ensuring they effectively convey your message to your audience.
Margins and Document Consistency
Maintaining consistency in margin settings across multiple documents is essential for creating a cohesive and professional appearance. Consistent margins help ensure that all documents adhere to the same formatting standards, making them easier to read and providing a sense of uniformity.
One effective way to maintain margin consistency is by setting default margins in Google Docs, as discussed earlier in this guide. By establishing default margins, you can ensure that all new documents automatically adhere to the same formatting standards, reducing the need for manual adjustments.
When working on a series of related documents, such as a report or presentation, consider creating a template with the desired margin settings. This template can serve as a starting point for each new document, ensuring that all documents in the series maintain a consistent appearance. Google Docs allows you to save and reuse templates, streamlining the document creation process and promoting consistency.
Finally, consider conducting a final review of all documents to ensure margin consistency before distributing or sharing them. This review can help identify any inconsistencies or issues that may have arisen during the editing process, allowing you to address them before the final document is shared with the intended audience.
By prioritizing margin and document consistency, you can enhance the professionalism and readability of your documents, ensuring they effectively communicate your message and meet the expectations of your audience.
Common Margin Mistakes to Avoid
When adjusting margins in Google Docs, it's important to be aware of common mistakes that can detract from the overall appearance and readability of your document. By avoiding these pitfalls, you can ensure that your document looks professional and effectively communicates your message.
One common mistake is setting margins that are too narrow. While narrow margins can save space, they can also make the text appear cramped and difficult to read. To avoid this issue, ensure that your margins provide sufficient space around the text, creating a balanced and readable layout.
Conversely, setting margins that are too wide can waste valuable space and make the document appear sparse. While wide margins can create a sense of elegance, they should be used judiciously to maintain a professional appearance. Aim for a configuration that balances aesthetics and functionality, providing adequate space without sacrificing readability.
Another mistake is inconsistent margin settings, which can create an unprofessional and disjointed appearance. Ensure that margins are consistent throughout the document and across related documents to maintain a cohesive look. Use the Page Setup dialog to set uniform margins and consider using templates to promote consistency.
Finally, be mindful of how margin adjustments can impact other elements within the document, such as headers, footers, and images. Ensure that these elements are correctly aligned with the new margin settings, maintaining a professional and polished appearance.
By avoiding these common margin mistakes, you can enhance the visual appeal and readability of your document, ensuring it effectively communicates your message and meets the expectations of your audience.
Advanced Margin Techniques
For those looking to take their document formatting skills to the next level, exploring advanced margin techniques can provide new opportunities for creativity and customization. These techniques allow you to tailor your document's layout to meet specific needs and create unique and visually appealing designs.
One advanced technique involves creating asymmetrical margins, where the margins on one side of the document are different from those on the opposite side. This technique can be used to create a distinctive and modern look, drawing attention to specific sections of the document or accommodating unique design elements.
Another advanced technique is using custom margin sizes for specific sections of a document. This approach allows you to create distinct layouts within the same document, such as wider margins for introductory sections or narrower margins for dense, text-heavy sections. To achieve this, you can create section breaks and apply different margin settings to each section individually.
For documents that require precise alignment of text and images, consider using gridlines or guides to assist with margin adjustments. While Google Docs doesn't natively support gridlines, you can create a grid using tables or external design software and use it as a reference for aligning elements within your document.
Finally, consider experimenting with margin colors and backgrounds to create visually engaging layouts. While traditional documents typically use white margins, adding subtle colors or patterns can enhance the document's overall aesthetics and create a unique look. Be sure to maintain readability and professionalism when using this technique.
By exploring advanced margin techniques, you can unlock new possibilities for document design and create layouts that are both functional and visually appealing. These techniques allow you to tailor your document to meet specific needs and convey your message in a compelling and creative way.
Frequently Asked Questions
Q1: Can I set different margins for different pages in the same Google Docs document?
A1: Google Docs doesn't allow different margin settings for individual pages within a single document. However, you can use section breaks to apply different margins to specific sections of the document.
Q2: How can I ensure my margin settings are consistent across all documents?
A2: To ensure consistent margin settings, set your desired margins as the default in Google Docs or create a template with the preferred settings and use it for all new documents.
Q3: Why do my margins look different when I print my document?
A3: Differences in margin appearance when printing can be due to printer settings or compatibility issues. Check your printer's settings and consider exporting your document as a PDF for more accurate printing.
Q4: Can I apply margin settings to a single paragraph or section in Google Docs?
A4: Google Docs doesn't support individual margin settings for specific paragraphs. However, you can adjust paragraph indentation and spacing to create a similar effect.
Q5: How do I reset margins to their default settings in Google Docs?
A5: To reset margins to their default settings, open the Page Setup dialog and enter the standard margin size of one inch (2.54 cm) for all sides, then click "OK" to apply the changes.
Q6: Can I use the ruler in Google Docs to adjust margins for specific elements like images?
A6: The ruler in Google Docs is primarily used for adjusting overall document margins. For specific elements like images, use the alignment and positioning tools available in the toolbar.
Conclusion
Understanding how to change margins in Google Docs is a valuable skill that can enhance the appearance and readability of your documents. By mastering the various methods for adjusting margins, including using the Page Setup dialog and the ruler, you can create documents that are both professional and visually appealing.
Whether you're working on academic papers, business reports, or personal correspondence, well-chosen margins play a crucial role in ensuring your documents effectively communicate your message. By avoiding common margin mistakes and exploring advanced techniques, you can tailor your document's layout to meet specific needs and create unique and engaging designs.
With the insights and tips provided in this comprehensive guide, you're now equipped to confidently adjust margins in Google Docs and achieve optimal document formatting. Whether you're a seasoned Google Docs user or new to the platform, these skills will serve you well in creating polished and professional documents that impress your audience.
Article Recommendations

ncG1vNJzZmibkafBprjMmqmknaSeu6h6zqueaKGTpLuqr4yamq2qlajApr%2BMqJ1moJ%2BhubrDzqibaKCfrHq1u4ycn5qml5p6rq3RoKCnq12eu26zzqiepZ1dmbykv42hq6ak